

- Mindora Pulse
Molar Cavity: Causes, Stages, Symptoms and Treatment Guide (2026)
If a dentist recently told you that you have a cavity in one of your back teeth, or you’ve noticed a dark spot and are wondering what it means, you’re in the right place. Molar cavities are the most common type of tooth decay diagnosed in both adults and children — and for good reason. The deep grooves on the chewing surface of back teeth create the perfect hiding spots for bacteria and food debris, making molars far more vulnerable than front teeth.
This guide covers everything from the first signs of decay to advanced treatment options — including updated 2026 costs, what to do if your child has a cavity in a primary molar, how to tell decay apart from a simple stain, and what it actually means when a dentist uses the term ‘access cavity.’ All information is sourced from the CDC, NIDCR, ADA, and peer-reviewed research.
What Is a Molar Cavity?
Quick Definition: A molar cavity is a permanently damaged area in the hard surface of a back tooth, caused by acid-producing bacteria that feed on sugar and starch. What begins as microscopic demineralization eventually becomes a visible hole — and without treatment, that hole reaches the nerve, causing pain, infection, and potential tooth loss.
Your molars are the broad, flat teeth at the back of your mouth. You have up to twelve of them — four first molars that erupt around age six, four second molars that arrive around age twelve, and up to four wisdom teeth (third molars) in late adolescence. These teeth handle the bulk of your chewing, and their deeply grooved surfaces are precisely where decay tends to begin.
Dental cavities — the clinical term is dental caries — are one of the most common chronic conditions worldwide. The CDC reports that nearly 90% of adults experience tooth decay at some point in their lives, and back teeth account for the majority of all cavities diagnosed. That’s a predictable outcome of anatomy: the grooves and pits on molar chewing surfaces trap food and bacteria that a toothbrush cannot always reach.
Are back-tooth cavities common? Extremely. The first permanent molar is statistically one of the first teeth to develop decay, often because it erupts before a child is old enough to brush effectively. By the time a second molar emerges at age twelve, a child may already have a history of treating their first. Wisdom tooth cavities are common in late teens and adults, though the calculus there shifts: whether to fill or remove depends on the tooth’s position and long-term viability.
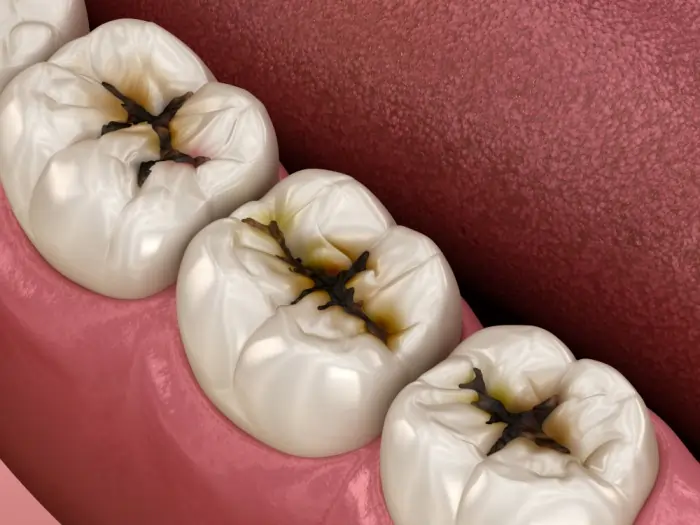
What Does a Molar Cavity Look Like?
Appearance changes dramatically depending on how far decay has progressed. Many people search for pictures of molar decay expecting something obvious — a dark hole, a blackened tooth. The reality is that early cavities look like almost nothing at all.
Early Stage
The very first sign is a white or chalky spot on the enamel surface. This is called a white spot lesion. It means the enamel has started losing minerals but hasn’t broken down yet — which also means it’s the only stage where decay is still reversible with fluoride. Most people never notice it.
As the lesion progresses, the chalky area turns light brown. If you look at a small, early-stage cavity on a back molar, you’d typically see a faint brown dot or shadow sitting in one of the natural grooves on the chewing surface. It’s easy to dismiss as a food stain, which is why so many cavities go untreated until they’re much larger.
Mid Stage
Once decay has moved through the enamel into the softer dentin layer beneath it, the discoloration darkens and spreads. The spot becomes clearly brown or gray. The surface may feel slightly rough or sticky when you run your tongue across it. A shadow might be visible through the enamel. This is the stage where sensitivity to cold or sweet foods often begins.
Advanced Stage
A deep, long-standing cavity in a molar is hard to miss. There may be a visible pit or crater in the tooth surface. The surrounding enamel can look gray because decay is visible through it. In the worst cases, the tooth structure becomes so weakened that it chips or breaks under normal chewing pressure — patients often describe this as ‘my tooth just crumbled.’ At this stage, pain can be constant and severe.
What to Look For: Stage-by-Stage Visual Guide
- Stage 1 — White or chalky spot in a groove. No hole. Easily missed. Still reversible.
- Stage 2 — Light brown discoloration. Enamel is breached but decay is still shallow.
- Stage 3 — Darker brown or gray area. Shadow visible through enamel. Sensitivity begins.
- Stage 4 — Clear pit or hole. Tooth may look gray. Pain when biting or drinking cold liquids.
- Stage 5 — Large crater or broken tooth. Throbbing pain. Possible swelling at the gum.
Tip: Ask your dentist to walk you through your X-rays — you’ll be able to see the shadow of decay inside the tooth structure and understand exactly what stage you’re at.
Symptoms — What Does a Molar Cavity Feel Like?
This is where a lot of people get into trouble: early cavities almost never hurt. The enamel layer has no nerve endings, so decay moving through it is completely painless. By the time a cavity starts causing symptoms, it has usually progressed well into the dentin — or deeper.
Here is what to watch for as decay moves inward:
| Symptom | What It Signals | How Urgent |
|---|---|---|
| No pain, no sensitivity | Possible early decay — enamel only | Schedule a routine checkup |
| Brief twinge on cold or sweets | Decay has likely reached the dentin | See a dentist within 2 weeks |
| Sensitivity that lingers more than 30 seconds | Pulp may be irritated | Call for an appointment this week |
| Pain when biting or chewing | Significant dentin or pulp involvement | Appointment within 48 hours |
| Spontaneous, throbbing pain | Pulp infection | Call the dentist today |
| Swelling, fever, or visible pus | Dental abscess — spreading infection | Emergency care now |
Beyond pain, watch for these other signs: food consistently getting caught in the same spot on a back tooth, a rough or sharp edge that wasn’t there before, persistent bad breath that brushing doesn’t resolve, or a visible dark spot or hole that seems to be growing. Any of these warrants a dental visit — don’t wait for toothache to appear.
When to See a Dentist
- Within 1–2 weeks: you notice a dark spot, food is trapping in one spot, or you have brief sensitivity to cold or sweet.
- Within 48 hours: pain when biting, or sensitivity that takes more than 30 seconds to fade after cold stimulus.
- Same day: severe throbbing pain, swelling in the jaw or gum, fever, or visible pus near a tooth. These are signs of a dental abscess — a genuine emergency.
The Five Stages of Molar Cavity Progression
Understanding how decay spreads through a tooth matters for one practical reason: every stage you let it advance roughly doubles the cost and complexity of treatment. A white spot treated with fluoride costs almost nothing. The same tooth, untreated for two years, may need a root canal and a crown costing $2,000 or more.
| Stage | What’s Happening Inside the Tooth | What You Might See or Feel | Treatment | Reversible? | Approx. Cost |
|---|---|---|---|---|---|
| 1 — White Spot | Enamel losing minerals; no hole yet | Chalky white or pale spot; no sensitivity | Fluoride varnish or remineralizing treatment | Yes | $25–$75 |
| 2 — Enamel Decay | Bacteria have broken through the enamel surface | Small dark dot; no pain yet | Tooth-colored or silver filling | No | $150–$300 |
| 3 — Dentin Decay | Decay reaches the softer dentin layer | Dark area; sensitivity to cold and sweets | Filling, inlay, or onlay | No | $250–$900 |
| 4 — Pulp Involvement | Bacteria reach the nerve (pulp) of the tooth | Visible damage; pain when biting; throbbing | Root canal treatment + crown | No | $1,900–$3,500 |
| 5 — Abscess | Infection spreads to surrounding bone and tissue | Swelling, pus, severe pain, possible fever | Root canal or extraction + antibiotics | No | $2,000–$5,500+ |
Real-world example: David, 34, noticed a small dark spot on a lower back molar during a routine toothbrushing. He put off scheduling an appointment for nine months. By the time he went in, the decay had reached the pulp. What would have been a straightforward filling costing around $200 became a root canal and crown at just over $2,300. The dentist told him the same cavity, caught six months earlier, would have taken one appointment and no anesthesia beyond a simple numbing injection.
Where Cavities Form on a Molar
Not all molar cavities look the same, because they don’t all start in the same place. The location affects how easy the cavity is to detect, how quickly it progresses, and what treatment it requires.
The Chewing Surface (Occlusal Cavity)
This is the most common type. The top of a molar has a landscape of peaks and valleys — fissures and pits that are incredibly efficient at trapping food and bacteria. Even thorough brushing can’t always reach the bottom of deep fissures. Decay that begins here is often visible as a dark spot in one of those grooves, though an explorer probe is needed to confirm whether the enamel has been breached.
Between Two Adjacent Teeth (Interproximal Cavity)
These are the sneakiest cavities dentists find. They develop in the contact zone between two back teeth — a spot you simply cannot see with a mirror, and that a toothbrush bristle cannot reach. The only reliable way to detect this type is a bitewing X-ray, where the decay appears as a dark triangular shadow inside the enamel.
This is the strongest argument for keeping up with routine X-rays. A small interproximal cavity caught on film requires a simple filling. Left undetected for another year, it can become a root canal.
At the Gumline (Cervical or Root Cavity)
Where the tooth meets the gum tissue is another vulnerable zone. People who brush too aggressively over many years can wear down the thin enamel layer at the neck of the tooth, exposing the slightly softer cementum below. Those with receding gums face the same exposure. Root surface decay progresses faster than decay in the crown of the tooth, because there’s no thick enamel layer to slow it down.
The Back Surface of the Rearmost Molar
The very back surface of a second or third molar is one of the hardest areas in the mouth to clean effectively. It’s simply too far back for most people to reach comfortably. Decay here is common and almost never visible without a dental mirror or X-ray — which is one of the reasons skipping dental checkups for several years so often leads to multiple large cavities appearing at once.
Upper vs. Lower Molar Cavities
- Upper (maxillary) molars typically have three roots; lower (mandibular) molars usually have two. This anatomy matters if a root canal becomes necessary — upper molars are more complex and therefore more expensive to treat.
- The decay process itself is identical regardless of jaw. What differs is the access: upper molars can be harder to clean because the brush must work against gravity, while lower molars accumulate more plaque because saliva pools there.
Cavity or Stain? How to Tell the Difference
A dark spot on a back tooth doesn’t automatically mean decay. Coffee, tea, tobacco, certain medications, and even some foods leave behind external staining that sits on the tooth surface without causing any structural damage. But it’s also the case that a stain and an early cavity can look almost identical to the untrained eye — which is exactly why this is one of the most common questions people bring to their dentists.
Here’s how professionals distinguish between the two:
| Feature | Cavity | Stain or Discoloration |
|---|---|---|
| Color and location | Brown, gray, or black — usually within the groove or pit structure of the tooth | Brown, yellow, or black — often broader, more diffuse, can appear anywhere on the surface |
| Texture under a probe | Soft or slightly sticky — the explorer catches on softened enamel | Hard and smooth — the probe slides straight across without catching |
| Sensitivity | Develops as decay progresses deeper | None — stains are purely cosmetic |
| Appearance on X-ray | Shows as a dark shadow inside the tooth structure | Invisible on X-rays — stain is only on the surface |
| Does it change over time? | Yes — grows deeper and wider without treatment | Usually stable, may lighten with professional cleaning |
| Treatment needed | Filling, root canal, or extraction depending on stage | Professional cleaning, polishing, or whitening if desired |
Dark spots that aren’t cavities include coffee and tea staining, tobacco discoloration, iron supplement residue, staining from chlorhexidine mouth rinse used long-term, and what dentists call ‘amalgam tattooing’ — a gray shadow from an old silver filling that has leached slightly into adjacent tooth structure.
The bottom line: don’t try to diagnose this yourself from appearance. If a dark spot is soft, located in a groove, or accompanied by any sensitivity — assume it needs to be checked. If a dentist probes it and takes a film, they can tell you definitively within a few minutes.
What Causes Cavities in Back Teeth?
The biological mechanism behind a cavity is simple: bacteria in dental plaque metabolize sugar and produce acid. That acid demineralizes enamel. Given enough time and enough acid exposure, a hole forms.
The reason molars are hit hardest comes down to three structural facts:
- Deep grooves and pits. The chewing surface of a molar is not flat — it has a complex landscape of furrows that are ideal for trapping food particles and protecting the bacteria inside from being brushed away.
- Difficult access. Back teeth are harder to brush thoroughly. Most people can reach the front surfaces of their molars without much trouble, but cleaning the grooves on the chewing surface, and especially the contact areas between adjacent back teeth, requires deliberate technique.
- High chewing forces. The mechanical stress of chewing creates microscopic cracks in enamel over time, giving bacteria additional entry points.
Several factors increase your personal risk beyond anatomy:
- Frequent consumption of sugar or refined carbohydrates. Every time you eat or drink something sugary, you’re giving plaque bacteria about 20 minutes of active acid production. Sipping a soda throughout the day is far more damaging than drinking the same amount with a meal.
- Dry mouth (xerostomia). Saliva is your mouth’s natural defense against acid — it neutralizes pH and remineralizes enamel. Medications, autoimmune conditions, and radiation therapy to the head and neck can dramatically reduce saliva flow and accelerate decay.
- Acid reflux or frequent vomiting. Stomach acid is far more corrosive than the acid bacteria produce. People with GERD or eating disorders often develop severe, rapid enamel erosion.
- Not flossing. Interproximal decay — the kind that develops between adjacent teeth — is almost entirely preventable with daily flossing. Brushing alone cannot reach the contact zones between back teeth.
- Skipping dental sealants in childhood. Sealants are a thin resin coating applied to the grooves of molars. They physically block bacteria from settling into the fissures. Children who receive sealants on their first and second molars have up to 80% lower rates of molar decay compared to those who don’t, according to CDC data.
- Inadequate fluoride exposure. Fluoride doesn’t just prevent new cavities — it helps reverse early demineralization. Communities with fluoridated water and individuals who use fluoride toothpaste consistently have measurably lower rates of tooth decay.
A note on pets: Some people searching this topic are looking for information about decay in dogs’ back teeth. Dogs develop a different type of dental disease in their carnassial teeth that shares some characteristics with human molar decay. For pet dental concerns, please consult a veterinary dentist. This guide covers human dental health only.
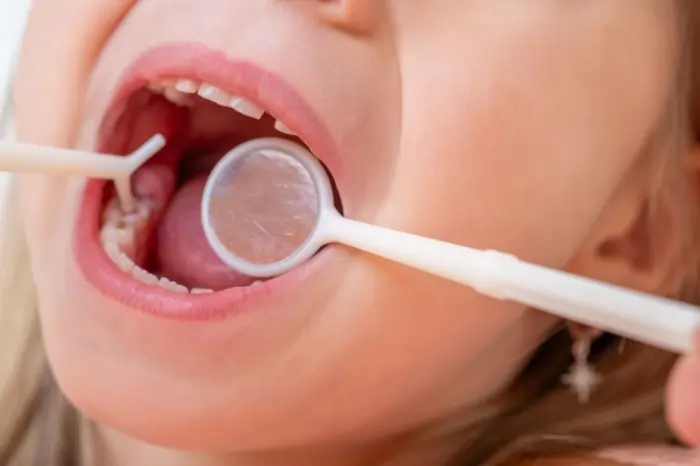
How a Dentist Diagnoses Molar Decay
A thorough diagnosis typically involves several tools used together — because no single method catches every cavity every time.
- Visual examination. Using a bright light and dental mirror, the dentist looks for changes in color, surface texture, or tooth structure. This is effective for occlusal (chewing surface) cavities and any decay that has progressed to a visible hole.
- Explorer probe. A sharp metal instrument is gently dragged across the tooth surface. Healthy enamel feels smooth; softened or decayed enamel catches the tip slightly. This helps distinguish early decay from a stain in a groove.
- Bitewing X-rays. These are essential for detecting decay between adjacent back teeth — the type invisible to the eye and undetectable with a probe from the outside. The American Dental Association recommends X-ray frequency based on individual risk, ranging from every 6 months for high-risk patients to every 2–3 years for very low-risk adults.
- Laser fluorescence (DIAGNOdent). A handheld laser measures fluorescence inside the tooth. Healthy enamel reflects differently than decayed structure, allowing detection of early subsurface decay before it’s visible on a film.
- Intraoral camera. A small camera shows a magnified, real-time image of the tooth on a screen next to you. This is particularly useful for helping you see exactly what the dentist is seeing and understand the decision being recommended.
Early detection is almost always in your financial and physical interest. A cavity found at Stage 1 or 2 requires one short appointment, local anesthesia, and a filling. The same cavity found at Stage 4 requires multiple appointments, root canal treatment, a crown, and significantly more recovery time — and costs five to ten times more.
Molar Cavity Treatment Options
Treatment is determined by the stage of decay. Here’s a complete overview of every option used in clinical practice:
| Treatment | When It's Used | Time Required | Anesthesia? | Lifespan |
|---|---|---|---|---|
| Fluoride varnish / remineralization | Stage 1 only – white spot lesions | 15 minutes, 1 visit | No | Ongoing – repeat every 3–6 months |
| Silver diamine fluoride (SDF) | Stage 1–2; especially in children or anxious patients | 5 minutes, 1 visit | No | Arrests decay; tooth discolors black |
| Composite (tooth-colored) filling | Stage 2–3 | 45–90 minutes, 1 visit | Yes – local | 7–12 years on average |
| Amalgam (silver) filling | Stage 2–3; larger cavities in back teeth | 45–60 minutes, 1 visit | Yes – local | 10–15+ years; very durable |
| Inlay | Stage 3; decay within the cusp tips | 2 visits | Yes – local | 15–25 years |
| Onlay | Stage 3; decay covering one or more cusps | 2 visits | Yes – local | 15–30 years |
| Root canal + crown | Stage 4; pulp is infected or dead | 2–3 visits | Yes – local | 10–15+ years with proper care |
| Tooth extraction | Stage 5; tooth is unsalvageable | 30–90 minutes | Yes – local | Permanent removal |
| Dental implant (post-extraction) | Replacing a removed molar | 3–6 months total | Yes – local + optional sedation | 15–25+ years |
Tooth-colored composite fillings are the most common choice for molar cavities today. Some dentists still recommend amalgam for large back-tooth fillings because of its durability and lower cost — a practical consideration given that back teeth endure significant chewing forces for decades.
For a tooth that has advanced to Stage 4, the root canal is the preferred path over extraction whenever the root structure is intact. Despite its reputation, modern root canal treatment is no more uncomfortable than a routine filling for most patients. The procedure removes infected pulp tissue, cleans and seals the canals, and allows the tooth to function normally once a crown is placed over it.
Molar Cavity Treatment Cost in 2026
Cost is one of the most common reasons people delay dental treatment — and unfortunately, delay almost always makes the final bill larger. Here are the most current figures for 2026, with and without insurance:
| Treatment | Without Insurance | With PPO Insurance* | Notes |
|---|---|---|---|
| Fluoride varnish | $25–$75 | Usually $0 — fully covered | Best return on investment in dentistry |
| Silver diamine fluoride (SDF) | $75–$150 per tooth | Often covered for children | Darkens the cavity; no drilling needed |
| Small filling (1 surface) | $150–$250 | $20–$100 copay | Most common molar treatment |
| Larger filling (2–3 surfaces) | $250–$450 | $50–$150 copay | For cavities that span multiple grooves |
| Inlay (porcelain or gold) | $800–$1,500 | $300–$700 copay | For large cavities that stop at the cusps |
| Onlay | $1,000–$1,800 | $350–$900 copay | Covers more surface than an inlay |
| Root canal — 1st or 2nd molar | $890–$2,500 | $400–$900 copay | Molar root canals cost more than front teeth |
| Root canal — 3rd molar (wisdom) | $1,000–$1,800 | $400–$1,000 copay | Weigh against extraction cost and long-term value |
| Porcelain or metal crown | $1,000–$2,000 | $400–$1,000 copay | Required after most molar root canals |
| Simple extraction | $150–$400 | $50–$150 copay | For teeth too damaged to restore |
| Surgical extraction | $300–$700 | $100–$350 copay | Impacted or fractured below gum level |
| Dental implant (full) | $3,000–$5,500 | Rarely covered | Long-term single-tooth replacement |
*Most PPO dental plans cover 80% of basic restorative procedures (fillings) and 50% of major restorative procedures (crowns, root canals) after the deductible. Coverage limits of $1,000–$2,000 per year mean that a root canal and crown in a single year may exceed your annual maximum.
Cavities in Children's Molars
One of the most common parental questions in dentistry is: does a cavity in a baby tooth really need to be treated? The tooth is going to fall out anyway — why go through the stress and expense of treating it?
The answer is almost always yes. Primary molars serve important functions that go beyond temporary placeholders. They maintain the spacing that guides permanent teeth into correct alignment. They’re essential for chewing, which affects nutrition. And an untreated abscess in a baby tooth can damage the permanent tooth developing directly beneath it in the jawbone.
The CDC reports that approximately 20% of children between the ages of 5 and 11 have at least one untreated cavity. Decay in very young children — sometimes as early as age 2 or 3, once primary molars emerge — is often linked to prolonged bottle feeding with juice or milk, particularly at bedtime. This pattern of decay is so well-recognized it has a clinical name: early childhood caries.
| Treatment | Best For | Age Range | Involves Drilling? | Notes |
|---|---|---|---|---|
| Fluoride varnish | White spot lesions; prevention | Any age | No | Applied in minutes; repeat every 3–6 months for high-risk children |
| Silver diamine fluoride (SDF) | Stopping active decay without drilling | Toddlers and older | No | Turns cavity black; excellent for anxious young patients |
| Atraumatic restorative treatment (ART) | Soft decay in cooperative toddlers | Ages 2–5 | No — hand instruments only | Glass ionomer cement seals the cavity; no anesthesia |
| Composite filling | Moderate decay; aesthetics matter | Ages 3 and up | Yes | Standard white filling; good for visible areas |
| Stainless steel crown | Severely decayed primary molar | Ages 2–10 | Yes | Placed in one visit; very durable; often most cost-effective option |
| Pulpotomy (baby root canal) | Decay has reached the pulp | Ages 3–10 | Yes | Removes infected pulp; saves the primary tooth until natural loss |
Treatment at age 4 looks different than treatment at age 8. A 3- or 4-year-old with a cavity in a back primary molar is often managed with silver diamine fluoride — a liquid applied with a tiny brush in about five minutes, no drilling, no needle, no crying. The cavity turns black (which is expected and harmless) and the decay is arrested. At age 6 or 7, the same child is more likely to tolerate a conventional filling.
Practical example: A parent brings in a 3-year-old whose lower back baby tooth shows a small brown spot at the checkup. The pediatric dentist applies silver diamine fluoride in one visit for $90. The spot darkens and stabilizes. At age 6, the primary molar falls out naturally and the permanent molar comes in unaffected. Compare this to the alternative: waiting until the child complains of pain, at which point the decay has often reached the nerve and requires sedation to treat — a much more stressful and expensive outcome for everyone involved.
Large or Deep Molar Cavities — Can the Tooth Be Saved?
If a dentist tells you that you have extensive decay in a back tooth and raises the possibility of extraction, it’s reasonable to ask: can this tooth be saved?
In most cases, the answer is yes — even with significant decay. The deciding factors are:
- Whether the pulp is involved. If bacteria have reached the nerve tissue, a root canal is needed. But a root canal doesn’t mean the tooth is lost — it means the infected tissue is removed, the canals are cleaned and sealed, and a crown is placed to protect the remaining structure.
- How much healthy tooth structure remains. A crown needs enough tooth to anchor onto. If decay has removed most of the crown above the gum line, a post may be used inside the root to provide additional support — but this is still a tooth-saving procedure.
- Root condition. A vertical root fracture — a crack running the length of the root — cannot be repaired. This is the most common reason a tooth genuinely cannot be saved.
- Decay below the gum line. If the cavity extends more than 4 millimeters below the gum margin, creating a crown is technically impossible without additional gum surgery. This is a real but not absolute barrier.
The American Association of Endodontists reports root canal success rates above 95% on intact roots. Before agreeing to extraction of a molar you’d like to keep, it’s worth asking for a referral to an endodontist — a root canal specialist — for a second opinion.
Decision Framework for a Severely Decayed Molar
Likely saveable: Decay has not reached below the gumline; root is intact; enough healthy structure exists for a crown to anchor onto.
Likely not saveable: Vertical root fracture; decay extends far below gum level; insufficient remaining structure; patient is not willing to pursue root canal therapy.
Before deciding: Request a periapical X-ray of the specific tooth, or a CBCT (cone beam) scan if structural integrity is in question. Then consider a second opinion from an endodontist.
What Is a Molar Access Cavity?
If you’ve seen the phrase ‘access cavity’ while researching molar dental work, it refers to something specific and different from decay.
An access cavity — also called an access opening — is the deliberate entry hole that a dentist drills through the top of a molar to perform a root canal. It is not a cavity caused by bacteria. It’s a precisely shaped opening designed to give the endodontist clear, straight-line access to the canal system inside the tooth roots.
The location and shape of the access opening differs depending on which molar is being treated:
| Molar | Access Opening Location | Typical Number of Canals |
|---|---|---|
| Lower first molar (mandibular) | Center of the chewing surface | 3–4 canals: 2 on the front root, 1–2 on the back root |
| Upper first molar (maxillary) | Slightly toward the cheek side | 3–4 canals: 2 buccal canals, 1–2 palatal canals |
| Lower second molar | Similar to lower first molar | 2–4 canals; roots sometimes fused |
| Upper second molar | Similar to upper first molar | 2–4 canals; anatomy varies considerably |
| Third molar (wisdom tooth) | Center of chewing surface | Highly variable: 1 to 5+ canals; curved roots common |
When your endodontist refers to preparing the ‘access’ on an upper or lower molar, they’re describing the entry point of the root canal procedure — not a new area of bacterial decay. This terminology sometimes causes confusion for patients reading their own clinical notes.
How to Prevent Molar Cavities
Prevention is where the real leverage is. The interventions below aren’t complicated — but they require consistency, and some require deliberate attention to the back teeth specifically.
- Improve your brushing technique for back teeth. Most people brush their front teeth well and their back teeth poorly. Angle your brush at 45 degrees toward the gum line and make sure you’re scrubbing the chewing surface, the outer face, and the inner face of each molar. Electric toothbrushes with oscillating-rotating heads have been shown in clinical research to outperform manual brushing on complex molar surfaces.
- Floss — especially between your back teeth. Interproximal decay between adjacent molars is almost entirely preventable with daily flossing. If string floss is hard to maneuver this far back, a water flosser or small interdental brushes are excellent alternatives.
- Use a fluoride toothpaste, consistently. Standard over-the-counter toothpastes in the U.S. contain 1,000–1,450 ppm fluoride — enough to remineralize early lesions and significantly slow decay progression. Don’t rinse your mouth with water immediately after brushing; spit and leave a thin residue of toothpaste on your teeth.
- Get dental sealants for your children’s molars. The CDC recommends sealants when permanent first molars erupt (around age 6) and again when second molars emerge (around age 12). A 2023 Cochrane review found sealants reduce the incidence of molar cavities by up to 80% over 24 months compared to no treatment. This is one of the best investments in pediatric dental health available.
- Reduce the frequency — not just the amount — of sugar exposure. Eating a candy bar once is less damaging than sipping a sweetened iced coffee over three hours. Every sugar exposure gives bacteria 20 minutes of active acid production. Fewer exposures per day means far less cumulative acid time, regardless of total sugar quantity.
- Ask about in-office fluoride varnish. For patients with dry mouth, a history of frequent cavities, or other risk factors, having fluoride varnish applied at each cleaning appointment (every 3–6 months) provides meaningful additional protection.
- Keep your regular dental appointments. The single most reliably cost-effective thing you can do for your dental health is show up for routine exams. Catching a cavity at Stage 1 or 2 saves you from the pain, time, and cost of Stages 4 and 5.
Take Action
- If you suspect decay in a back tooth: Schedule an appointment within 1–2 weeks. Don’t wait for pain.
- If you have severe pain, swelling, or fever: Seek dental care today. These are signs of abscess.
- No insurance or limited income: Search for a federally qualified health center at findahealthcenter.hrsa.gov, or find a dental school clinic at ada.org/find-a-dentist.
- For your child’s primary molars: See an AAPD-member pediatric dentist. Early intervention is almost always less stressful and less expensive than waiting.
Key Takeaways
- Catch it early. A Stage 1 white spot can be reversed with fluoride at minimal cost. A Stage 2 filling costs $150–$300. A Stage 4 root canal and crown costs $2,000–$3,500. The earlier you act, the better the outcome in every dimension.
- Pain is a late warning sign. Early molar decay produces no symptoms. Regular X-rays are the only reliable way to catch interproximal or subsurface decay before it becomes a much larger problem.
- Prevention genuinely works. Fluoride toothpaste, daily flossing, dental sealants for children, and limiting sugar exposure between meals eliminate the vast majority of molar cavities before they start.
MindoraPulse – Your Mental Health Hub
MindoraPulse brings you trusted insights, expert tips, and practical guidance on mental health and wellness. Explore MindoraPulse to stay informed and support your well-being.
Frequently Asked Questions
What exactly is a molar cavity?
A molar cavity is a permanent hole in a back tooth caused by bacterial decay. Bacteria that live in dental plaque produce acid when they consume sugar, and that acid eats through the outer enamel layer of the tooth. Once through the enamel, decay spreads faster into the softer dentin beneath. Left untreated, it reaches the pulp — the nerve and blood supply at the tooth’s center — causing infection and pain. The CDC identifies dental caries as one of the most common chronic diseases in the United States.
What does a cavity in a back tooth feel like?
Early cavities feel like nothing at all — the enamel has no nerve endings. As decay moves into the dentin, you may notice brief sensitivity when eating cold, sweet, or acidic foods. This sensitivity deepens as decay progresses: first a twinge, then a lingering ache, then pain when biting, and eventually constant throbbing if the pulp becomes infected. The progression from symptom-free to severe pain can happen over months or years, depending on diet, hygiene, and individual variation.
What are my treatment options if I have decay in a molar?
Options depend on how far decay has progressed. A very early white spot lesion can be remineralized with professional fluoride varnish — no drilling needed. A cavity that has breached the enamel requires a filling, which is a one-appointment procedure under local anesthesia. Deeper decay into the dentin may call for a larger filling, an inlay, or an onlay. If the nerve has been reached, root canal treatment followed by a crown is the standard approach. An irreparably damaged tooth requires extraction, after which an implant or bridge can replace it.
How can I prevent cavities in my back teeth specifically?
The most effective approach targets back teeth directly: brush the chewing surfaces and back faces of molars with deliberate attention (an electric brush helps), floss or use a water flosser to clean between back teeth daily, use fluoride toothpaste without rinsing immediately after, and ask your dentist about sealants if you have deep grooves. For children, sealants on newly erupted first and second molars are among the most effective preventive interventions in dentistry, per CDC data.
Is a cavity in a back tooth a serious problem?
At Stages 1 and 2, it’s routine and easily managed. At Stages 4 and 5, it becomes a significant dental emergency. The condition itself is never the issue — the issue is always delay. A small cavity treated promptly is a minor, inexpensive inconvenience. The same cavity left for a year or two can result in root canal therapy, a crown, or tooth loss. The answer to ‘is this serious’ depends entirely on which stage you’re at and how quickly you respond.
What does molar cavity treatment cost in 2026?
A single-surface composite filling for a back tooth runs $150–$250 without insurance, or $20–$80 out of pocket with a typical PPO plan. A larger, multi-surface filling runs $250–$450. Root canal treatment on a molar costs $900–$1,500 without insurance. A crown adds another $1,000–$2,000. For patients without coverage, dental schools, federally qualified health centers, and in-house savings plans can significantly reduce these costs. The key cost-control strategy remains the same: treat early.
My young child has a cavity in a baby molar. Does it need treatment?
Almost always yes. Primary molars maintain spacing for permanent teeth, support proper chewing and speech development, and an infection in a baby tooth can spread to the permanent tooth forming beneath it. For very young children, treatment options that don’t require drilling — silver diamine fluoride, fluoride varnish, or atraumatic restorative treatment — are often used first. For older children or more advanced decay, conventional fillings or stainless steel crowns provide durable, cost-effective restoration. See a pediatric dentist as soon as decay is suspected.
Can I use home remedies to treat a molar cavity?
No home remedy can reverse a cavity that has progressed beyond the earliest white spot stage. For white spot lesions, fluoride toothpaste and remineralizing products containing calcium phosphate compounds have shown genuine benefit in early research. Xylitol gum can reduce the amount of cavity-causing bacteria in saliva. But none of these can close a hole that has already formed in enamel — that requires professional dental treatment. Using home remedies as a substitute for dental care allows the decay to deepen silently.
When should I go to the dentist instead of waiting?
Go within one to two weeks if you notice a dark spot on a back tooth, food consistently catching in the same spot, brief sensitivity to cold or sweet, or any visible change in a molar’s surface. Go within 48 hours if you have pain that lingers after cold stimulus, or pain when biting. Go today if you have a severe throbbing toothache, jaw swelling, fever, or visible pus near a tooth — these are signs of a dental abscess, which is a medical emergency that can spread beyond the mouth if left untreated.